

Photo By cocoate.com
Lately I’ve been working on some joomla sites for some friends and in one of the sites my friend wanted to add an imagemap. So I started researching what was the best way to go about doing this in a joomla site. I even posted a question in Stackoverflow. Well my search lead me here, it is a plugin for the default editor(TinyMCE) included in joomla that adds the ability to create and modify image maps in articles. After following the instructions on that page I still couldn’t see the image map button on the TinyMCE toolbar. I found some installation instructions within the downloaded package and they didn’t match the ones on the page, so I decided to give those a try, but there were some problems.
These are the instructions from the page referenced above:
- copy files from plugin_tinymce{x}.zip to {yourjoomlainstance}/plugins/editors/tinymce/jscripts/tiny_mce/plugins/imgmap/
- edit {yourjoomlainstance}/plugins/editors/tinymce.xml, after ‘directionality’ add lines:
<param name="imgmap" type="radio" default="1" label="Imagemap" description="Imagemap"><option value=”0″>Hide</option>
<option value=”1″>Show</option>
</param>
- edit {yourjoomlainstance}/plugins/editors/tinymce.php, after ‘XHTMLxtras’ add lines:
if ( $imgmap ) {$plugins[] = ‘imgmap’;
$buttons3[] = ‘imgmap’;
$elements[] = ‘img[usemap|class|src|border=0|alt|title|hspace|vspace|width|height|align|onmouseover|onmouseout|name],map[id|name],area[shape|alt|coords|href|target]’;
}
- go to Joomla admin/Plugin manager/Editor – TinyMCE 2.0/Advanced Parameters, and make sure Imagemap is set to Show.
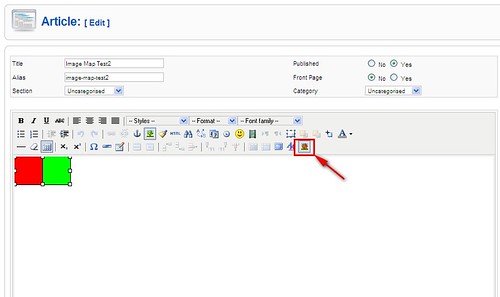
- go to article editor, click on any image, and notice the button highlighted on the toolbar, you are done:)
These are the instructions found within the downloaded package:
- copy files to plugins/imgmap/
- set up your instance in the tinyMCE.init method to use the plugin, like:
plugins : “table,save,advhr,advimage,imgmap,…”,
- set up your instance to use the imgmap button, for example:
theme_advanced_buttons3_add : “emotions,iespell,…,imgmap”,
- you might need to add:
extended_valid_elements : “img[usemap|class|src|border=0|alt|title|hspace|vspace|width|height|align|onmouseover|onmouseout|name],map[id|name],area[shape|alt|coords|href|target]”,
Ok so I had done the first step since I had already done the five ste.s. I never found the tinyMCE.init mentioned in the second step so I decided to skip the step. I didn’t understand where I was supposed to make the change mentioned in the third step so I decided to skip it as well. The parameter mentioned in the fourth step took a while to figure out, but I finally found it by going to Plugin Manager–>Editor – TinyMCE and it is in the Plugin Parameters(below is a screenshot).

After doing this last step I finally got the image map button to show on my TinyMCE toolbar.
In conclusion, to get this to work I had to use a combination of both instructions. The actual instructions should be:
- Copy files to plugins/imgmap/
- Edit {yourjoomlainstance}/plugins/editors/tinymce.xml, after ‘directionality’ add lines:
<param name="imgmap" type="radio" default="1" label="Imagemap" description="Imagemap"><option value=”0″>Hide</option>
<option value=”1″>Show</option>
</param>
- Edit {yourjoomlainstance}/plugins/editors/tinymce.php, after ‘XHTMLxtras’ add lines:
if ( $imgmap ) {$plugins[] = ‘imgmap’;
$buttons3[] = ‘imgmap’;
$elements[] = ‘img[usemap|class|src|border=0|alt|title|hspace|vspace|width|height|align|onmouseover|onmouseout|name],map[id|name],area[shape|alt|coords|href|target]’;
}
- Add the following to the “Extended Valid Elements” parameter:
img[usemap|class|src|border=0|alt|title|hspace|vspace|width|height|align|onmouseover|onmouseout|name],map[id|name],area[shape|alt|coords|href|target]