Better Java Development with Domiclipse

Standard
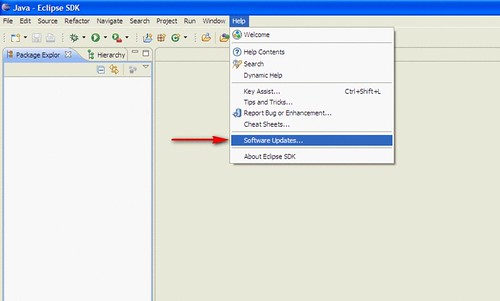
I have been using Domiclipse for over 2 years now and it is a great tool when doing java development within Notes.  It’s basically a set of plugins that allow you to import a notes application as a java project into eclipse and do development using all the great tools included in eclipse.  Then it lets you sync your changes back into your notes application with a click of a button.  Anyway, I decided to post a step-by-step tutorial of how to install Domiclipse into your existing copy of eclipse.First we open up the eclipse environment and we click on the Help–>Software Updates… menu item.

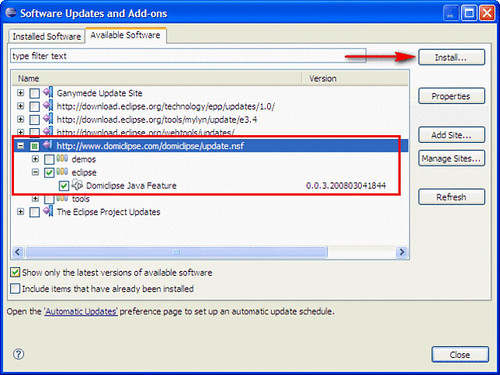
Next we have to add the update site url for Domiclipse.  On the Software Update and Add-ons window click on the Available Software tab and then click on the Add Site… button on the right.

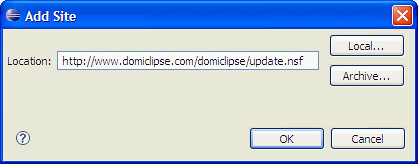
Next we add http://www.domiclipse.com/domiclipse/update.nsf as the location in the Add Site window and click on OK.

Once we have added the site to the Available Software, expand the site by clicking on the + on the left of the new site and this will fetch the available plugins from the Domiclipse site.  Next we want to expand the eclipse category and check the box next to the Domiclipse Java Feature.  The next thing to do is click the Install… button on the right and this will start the installation.

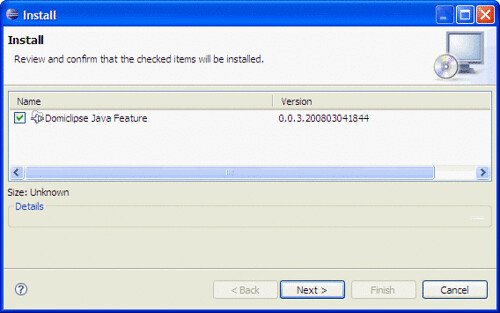
The next screen will ask you to confirm your choice, just click on the Next >

Next you will be asked to accept the license, here you will have to click on the I accept the terms of the license agreement radio button and then click on the Finish button.

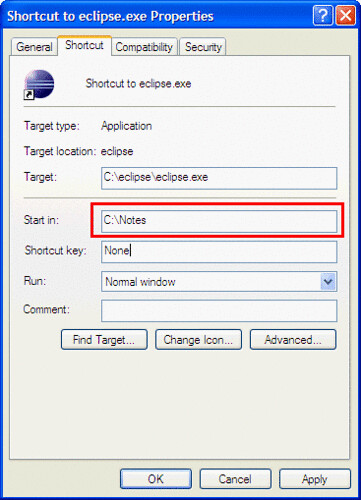
After the installation finishes you will need to shutdown eclipse and open the properties for your eclipse shortcut.  Here you will have to edit the Start in: property to match your Notes program directory in my case it is C:Notes

The final step would be to start up eclipse and verify that you have the Domiclipse icons on your toolbar.

Congratulations you have just installed Domiclipse into your eclipse environment.  Hope this helps some of you new that are new to java and eclipse.  Domino designer 8.5.1 is supposed to have most of the eclipse features, but Domiclipse will still be a great asset to those that don’t upgrade right away, which I’m guessing is most of us.

Using POI to Export Lotus Notes Data to Excel

Standard
As those who have been reading my previous posts have seen, I have been working on a project that involves exporting meta data from Lotus Notes documents to an excel sheet.  I’m using the CreateObject(“Excel.Application”) function to do this.  The problem is that the agents that do this export are scheduled and run on a server.  This means that excel has to be installed on that server for the process to work and most of the admins that I had to work with did not like the idea of having excel on a server they have to support. 

For this reason I started messing around with the apache project POI.  This project has pure java ports of file formats based on Microsoft’s OLE 2 Compound
Document Format.  So it has classes for creating excel spreadsheets without having excel installed on the server, which would make the admins happy.  So I created this simple class to create and write rows to an excel file.

package com.clr.excel;

import java.io.FileOutputStream;
import org.apache.poi.hssf.usermodel.HSSFRichTextString;
import org.apache.poi.hssf.usermodel.HSSFRow;
import org.apache.poi.hssf.usermodel.HSSFSheet;
import org.apache.poi.hssf.usermodel.HSSFWorkbook;

public class ExcelWriter {
    private int curRow;
    private HSSFWorkbook curWB;
    private HSSFSheet curSheet;

    public boolean writeExcelHeader(String[] rowValues) {
        try {
            this.curRow = 0;
            this.curWB = new HSSFWorkbook();
            this.curSheet = this.curWB.createSheet(“Sheet1”);

            //This will write the header row
            return(this.writeToExcel(rowValues));
        } catch(Exception ex) {
            ex.printStackTrace();
            return(false);   
        }
       
    }

    public boolean writeToExcel(String[] rowValues) {

        try {

            HSSFRow row = this.curSheet.createRow(this.curRow);

            for(int i = 0; i < rowValues.length; i++) {
                row.createCell(i).setCellValue(new HSSFRichTextString(rowValues[i]));
            }

            this.curRow++;

        } catch(Exception ex) {
            ex.printStackTrace();
            return(false);
        }

        return(true);
    }

    public boolean writeExcelFile(String fileName) {
        try {
            //Auto fit content
            for(int i = 0; i < 20; i++) {
                this.curSheet.autoSizeColumn((short)i);
            }

            // Write the output to a file
            FileOutputStream fileOut = new FileOutputStream(fileName);
            this.curWB.write(fileOut);
            fileOut.close();
        } catch(Exception ex) {
            ex.printStackTrace();
            return(false);
        }
       
        return(true);

    }

}

Again I used LS2J to use this class from my lotusScript agent.

These declarations are needed to use LS2J

Uselsx “*javacon”
Use “ExcelWriter”

Agent to create excel sheet.

Sub Initialize
    On Error Goto ErrorHandler
    Dim session As New NotesSession
    Dim db As NotesDatabase
    Dim view As NotesView
    Dim doc As NotesDocument
    Dim js As JAVASESSION
    Dim xlWriterClass As JAVACLASS
    Dim xlWriterObject As JavaObject
    Dim rowValues(1 To 3) As String
    Dim folderName As String
   
    Print “Started Running CreateExcel”
   
    folderName = “C:Temp”
   
    ‘Initialize column headers
    rowValues(1) = “Title”
    rowValues(2) = “Date”
    rowValues(3) = “Name”
   
    ‘Initialize Excel Writer class
    Set js = New JAVASESSION
    Set xlWriterClass = js.GetClass(“com.clr.excel.ExcelWriter”)
    Set xlWriterObject = xlWriterClass.CreateObject
    If(Not(xlWriterObject.writeExcelHeader(rowValues)))Then
        Print “Error creating excel sheet!”
        Exit Sub       
    End If
   
    Set db = session.CurrentDatabase
    Set view = db.GetView(“MainView”)
   
    Set doc = view.GetFirstDocument
    Do While(Not(doc Is Nothing))
       
        rowValues(1) = doc.Title(0)
        rowValues(2) = doc.selectedDate(0)
        rowValues(3) = doc.Name(0)
       
        ‘Write metadata
        If(Not(xlWriterObject.writeToExcel(rowValues)))Then
            Print “Could not write to excel!”
        End If
       
        Set doc = view.GetNextDocument(doc)
    Loop
   
Finished:
    xlWriterObject.writeExcelFile(folderName & “workbook.xls”)
   
    Exit Sub
   
ErrorHandler:
    Print “Error ” & Error & ” on line: ” & Erl
   
    Resume Finished
   
End Sub

Enjoy the code here.

Zip Extraction using LS2J

Standard
The last month I have been working on a project that involves converting notes documents to pdf and importing them within Documentum. This also involved extracting any attachments in the documents and also sending them to Documentum. The problems started when users found some attachments that had been sent to documentum and were zip files. I guess Documentum doesn’t index the content within zip files and the these files would not show up in the users search. So I had to find a way to decompress the zip files and actually send the content of these to Documentum. I went looking around the web and found How to extract file/files from a zip file. This did exactly what I needed, but one little catch all the other logic was already in a lotusScript agent, so I decided to use LS2J. It was my first time using LS2J so I did a search on nsftools.com since I remember that I had read a post about LS2J on Julian’s Blog. After that, I got to work and this is what I put together.

I created the following java script library using the java class from the site above and made minor tweaks for my situation:


package com.clr.zip;

import java.io.File;
import java.io.FileInputStream;
import java.io.FileOutputStream;
import java.util.zip.ZipEntry;
import java.util.zip.ZipInputStream;

public class ZipExtractor {

public String extractZip(String folderName, String fileName) {

try {
byte[] buf = new byte[1024];
ZipInputStream zipinputstream = null;
ZipEntry zipentry;
zipinputstream = new ZipInputStream(new FileInputStream(folderName + fileName));

zipentry = zipinputstream.getNextEntry();
while (zipentry != null) {
// for each entry to be extracted
String entryName = zipentry.getName();

int n;
FileOutputStream fileoutputstream;
File newFile = new File(entryName);
String directory = newFile.getParent();

if (directory == null) {
if (newFile.isDirectory()) {
break;
}
}

fileoutputstream = new FileOutputStream(folderName + entryName);

while ((n = zipinputstream.read(buf, 0, 1024)) > -1) {
fileoutputstream.write(buf, 0, n);
}

fileoutputstream.close();
zipinputstream.closeEntry();
zipentry = zipinputstream.getNextEntry();

}// while

zipinputstream.close();
return(“SUCCESS”);

} catch (Exception ex) {
ex.printStackTrace();
return (“ERROR”);
}

}
}

Then I modified my lotusscript agent to use this class to decompress the zip files.

To be able to use LS2J we have to add these to the Options section of our code


Uselsx “*javacon”
Use “ZipExtractor”

Then declare the following variables to work with the java class:


Dim js As JAVASESSION
Dim zipExtractorClass As JAVACLASS
Dim zipExtractorObject As JavaObject

Now all we have to do is use the following lines to actually decompress a zip file to a certain folder:


Set js = New JAVASESSION

‘Here we get a reference to the ZipExtractor class
Set zipExtractorClass = js.GetClass(“com.clr.zip.ZipExtractor”)

‘Here we get an actual instance of the ZipExtractor class
Set zipExtractorObject = zipExtractorClass.CreateObject

‘This is were the actual java class method is called and parameters are sent
result = zipExtractorObject.ExtractZip(folderName, attachName)

As we can see LS2J can be very handy to provide functionality in lotusscript that normally wouldn’t be possible. Hope others will find this helpful.

Here is a link to a demo db with the java class and the agent so you can mess around with it.